ShopDreamUp AI ArtDreamUp
OTO TUTORIAL
12 min read
Deviation Actions
PLEASE READ!
So you've read my recording tutorial (hopefully, and thanks for doing so ), recorded your bank and imported it into UTAU. You've found the UST to the first song you want to cover, but what is this? No sound plays, or really strange static or a lot of other potato-ness. Oh my-
After a few struggles and some googling, you find that you haven't oto'd your bank. What?
You find that it is a form of programming of syllables- and that experienced oto-ers can be paid to do your work. Crap- you've only got 10 points... (Been there, done that)
Have no fear! This is what this tutorial is for.
This tutorial will ensure that your UTAU will sing smoothly and wonderfully between notes. Whether the notes themselves is wrong or the tuning not fine enough is related to the UST (guide for that MIGHT come up if I ever learn to tune well)
So prepare yourself for the long and tedious work that is OTO-ing.
We'll be covering CV and VCV, since they're the most common. CVVC I have no idea how to oto, but I will provide a link to a guide in the final notes (that we were intending to use for a potential CVVC bank but things got too confusing/we were lazy).
Let's go over the details now.
To open the relevant window,

And this opens....
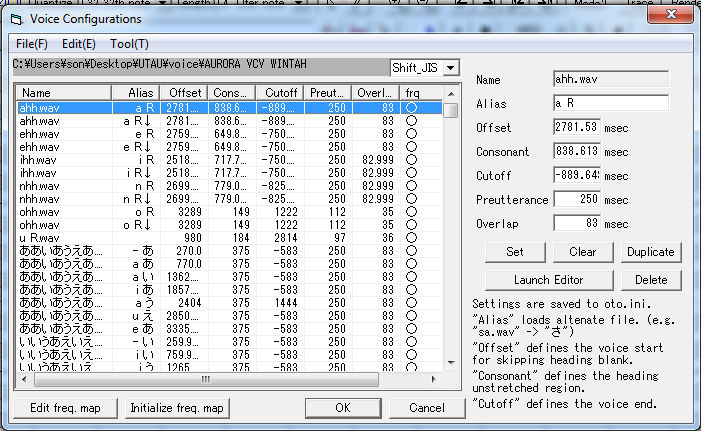
You'll learn to become VERY familiar with this box. (I hate opening this box...)
Now on the right hand side you can see:
1. Name of the sample (sample is named as this in your folder)
2. Alias (another way to name the sample. You can see that this is a breath sound, and any note named 'ahh' or 'a R' will play this sound in the UST)
3. Offset - Silences any sound in this area. It is a purple/blue section.
4. Consonant - A pink section that tells UTAU what NOT to stretch. It should have the consonant and the vowel until it stabilizes.
5. Cutoff - Silences any sound in this area. It is a purple/blue section AT THE END (similar to offset just at the end instead of the beginning of the sound)
6. Preutterance - Red line that marks where the consonant ends and the vowel begins.
7. Overlap - Green line that marks the area that can be overlapped with the previous syllable.
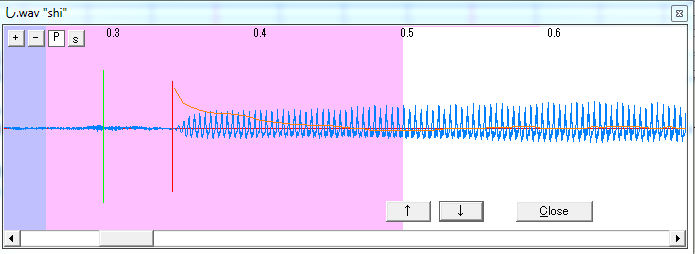
Selecting one of the samples in the box and clicking "Launch Editor" will bring you to this:
The coloured objects mentioned before in the list can be click+dragged
The three buttons on the bottom right do the following:
Up - Go to the sound sample above
Down - Go to the sound sample below (as ordered on the table in the Voice Configurations)
Close - Closes this editing box
REMEMBER TO CLICK OK TO SAVE YOUR SETTINGS, OR SET IF YOU MANUALLY EDIT THE NUMBERS IN THE BOX IN THE VOICE CONFIGURATION.
The sound samples are split into three different types: Vowels, Hard Consonants, Soft Consonants
I'll explain how to oto each of them one by one.
BEFORE YOU BEGIN OTO-ING PLEASE DOWNLOAD ONE OF THESE TWO FILES AND USE THIS TO REPLACE THE OTO FILE IN YOUR VOICEBANK FOLDER.
- SAMPLE FILE NAMES ARE IN HIRAGANA: Romaji alias (Note that these are numbers because this was copy-pasted from my UTAU's CV bank. Just edit the sliders. If you get a bunch of symbols, change to Japanese locale or use Applocale to open etcetc.)
- SAMPLE FILE NAMES ARE IN ENGLISH: Hiragana alias
What are these you ask? These are oto files that have the aliases already done for you so you don't have to do them one by one on your own! Just edit them about.

- Drag the offset (blue) till the wave has become stable. This is because for vowels, some of them are prone to having a little wonky sounds at the start (look carefully at the start of the blue wave. Can you see that it is a little different to, lets say the middle of the wave?), so you want to cut this out to ensure consistency. (Note: I did kind of cut off an excessive amount here. Anything from about 0.45+ is OK.)
- Drag the consonant (pink) over by about 0.1-0.2 seconds. (Or till the vowel has become stable)
- Leave the preutterance (red line) at 0
- Move the overlap (green) to halfway through the consonant (pink)
Then scroll to the end of the wave.

- Drag the cutoff (blue) to where the wave is still stable. This is to eliminate any fade outs/changes in voice as you finish the recording.

- Drag the offset (blue) to the start of the wave. (Note: If the consonant is excessively long, feel free to cut it down. It should only be maximum 0.1 seconds long.)
- Drag the consonant (pink) over by about 0.1-0.3 seconds. (Or till the vowel has become stable)
- Move the preutterance (red line) in between the consonant and the vowel. (This is usually where the wave changes pattern)
- Leave the overlap (green) at 0 (or move it back to negative a little) (Note: I prefer leaving it at 0)

Then scroll to the end of the wave.
- Drag the cutoff (blue) to where the wave is still stable. This is to eliminate any fade outs/changes in voice as you finish the recording.
- Drag the offset (blue) to the start of the wave. (Note: If the consonant is excessively long, feel free to cut it down. It should only be maximum 0.1 seconds long.)
- Drag the consonant (pink) over by about 0.1-0.3 seconds. (Or till the vowel has become stable)
- Move the preutterance (red line) in between the consonant and the vowel. (This is usually where the wave changes pattern)
- Move the overlap (green) to halfway in the consonant.

Then scroll to the end of the wave.
- Drag the cutoff (blue) to where the wave is still stable. This is to eliminate any fade outs/changes in voice as you finish the recording.
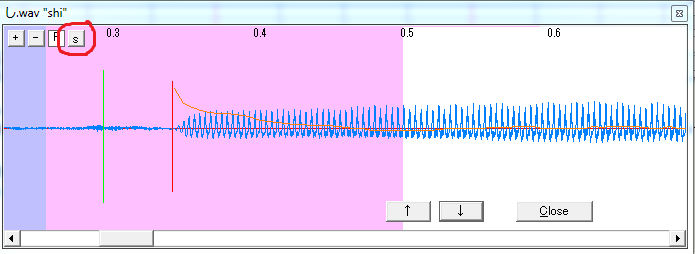
Clicking this circled button will make this happen to your box...

If yours comes up a bit faded and difficult to see the patterns, click the asterisk box that has now appeared next to the 's' box you clicked before
Then drag the slider up. This will improve the contrast.
Now, can you see the changes in patterns?
Vowels are usually several parallel white/slightly blue lines in the centre.
Consonants are usually a little more fragmented, like a cloud of light/dark blue pixels.
Keep at this for EVERY SINGLE SYLLABLE and you'll have yourself a nifty bank!
CONGRATULATIONS, YOU'VE NOW OTO'D YOUR CV VB AND IT IS NOW READY TO SING! Hope to see some lovely covers from you soon! -v-)/
Now, I HOPE you've used a tempo guide. If you have, this will be a lot more painless than it needs to be. If not- a lot more of these will come out potato.
We'll be using OREMO's VCV oto generator, so open up OREMO, change the directory folder to your voicebank.
Now, go to Generate oto.ini -> Kind of Utterance -> VCV
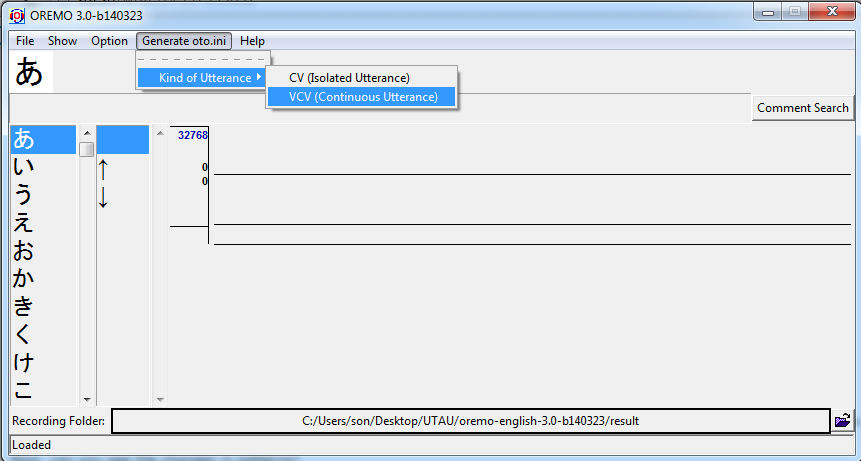
You'll then get this kind of window:

In the recording tempo, place the tempo you recorded at.
Now open up one of your samples. They should ALL begin at the same-ish time. Note down the start of this and place it in the box labelled "Utterance Start" and make sure you're in the right units! (800ms = 0.8 in the oto editing)
You can click "Initialise Parameters according to Recording Tempo" if you want, but it won't be perfect.
The guide for the numbers for each section is in this range:
Then click Generate Params (after you've made sure the boxes afterwards are ticked like this or something)
And hope for the best. (If an error occurs, untick the Parameter Auto Correction 2, and if it still occurs, untick the Parameter Auto Correction 1)
Then BAM you will be prompted to save your oto.ini file somewhere (put it in your Voicebank folder) and now, comes the moment of truth.
Open a UST and run your voicebank through it.
If it sounds choppy anywhere, click on that note and while it is highlighted, open the Voice Configurations.
Now click Launch Editor

Sample of the first sound

Sample of every sound after the first
Here is the sample to reference. Note the following characteristics:
- Offset (blue) - cuts off all but the end 1/3rd of the first sound. (If you are checking the first sound, leave 1/3rd of a blank space)
- Consonant (pink) - Covers 1/3rd of the second sound.
- Preutterance (red line) in between the end of the first sound and the beginning of the second sound (It's not perfect, but close enough. Considering that there are 1000+ samples to take care of, not all of them will be exact. It is up to your judgement as to what is 'close enough', but I think this is appropriate for the 'limit)
- Overlap (green) to halfway through the pink area of the first sound
- Cutoff (blue) - cuts off the end 1/3rd of the second sound.
This applies to all sounds.
If any of these are out, then it will ruin the rest of that one sample, and you'll have to manually fix it (using the guidelines I provided above)
If a LOT of them are out, then you should change the numbers in the oto.ini generator. If the red is too far forward, reduce the number in the preutterance etc.

Clicking this circled button will make this happen to your box...

If yours comes up a bit faded and difficult to see the patterns, click the asterisk box that has now appeared next to the 's' box you clicked before
Then drag the slider up. This will improve the contrast.
Now, can you see the changes in patterns?
Vowels are usually several parallel white/slightly blue lines in the centre.
Consonants are usually a little more fragmented, like a cloud of light/dark blue pixels.
Eventually after a lot of editing around, run through USTs, you'll get your perfect bank.
CONGRATULATIONS, YOU'VE NOW OTO'D YOUR VCV VB AND IT IS NOW READY TO SING! Hope to see some lovely covers from you soon! -v-)/
To make the rendering of the samples faster:
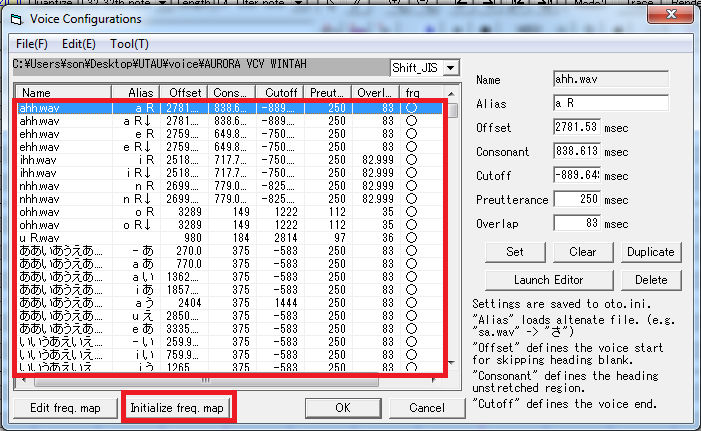
Right click anywhere on the table (highlighted here by the big red box). Go down and click select (It's the bottom most option that has (M) ). Then, right click it again, and then click select all (New bottom most option that has (A) or something along those lines). This will make all the tables be highlighted in blue. Once you have gotten to this stage, click the smaller circled red box here, called Initialize freq. This will render all the frequency files so that they load faster when you play a UST.
Thanks for reading, hope to see your UTAU up and about!
EDIT: 7/06/2021 While I appreciate the comments and would love to assist, I don't really dabble in UTAU anymore, so I wouldn't be the best person to be asking.
So you've read my recording tutorial (hopefully, and thanks for doing so
After a few struggles and some googling, you find that you haven't oto'd your bank. What?
You find that it is a form of programming of syllables- and that experienced oto-ers can be paid to do your work. Crap- you've only got 10 points... (Been there, done that)
Have no fear! This is what this tutorial is for.
This tutorial will ensure that your UTAU will sing smoothly and wonderfully between notes. Whether the notes themselves is wrong or the tuning not fine enough is related to the UST (guide for that MIGHT come up if I ever learn to tune well)
So prepare yourself for the long and tedious work that is OTO-ing.
We'll be covering CV and VCV, since they're the most common. CVVC I have no idea how to oto, but I will provide a link to a guide in the final notes (that we were intending to use for a potential CVVC bank but things got too confusing/we were lazy).
So here is a table of contents:
1. What IS oto-ing? What's all those lines and numbers?
2. CV otoing
3. VCV otoing
4. Final notes
1. What IS oto-ing? What's all those lines and numbers?
Simply put, otoing is programming UTAU to tell them 'this is a consonant, this is a vowel, this is how long the sample is, please adjust it accordingly'.Let's go over the details now.
To open the relevant window,

And this opens....

You'll learn to become VERY familiar with this box. (I hate opening this box...)
Now on the right hand side you can see:
1. Name of the sample (sample is named as this in your folder)
2. Alias (another way to name the sample. You can see that this is a breath sound, and any note named 'ahh' or 'a R' will play this sound in the UST)
3. Offset - Silences any sound in this area. It is a purple/blue section.
4. Consonant - A pink section that tells UTAU what NOT to stretch. It should have the consonant and the vowel until it stabilizes.
5. Cutoff - Silences any sound in this area. It is a purple/blue section AT THE END (similar to offset just at the end instead of the beginning of the sound)
6. Preutterance - Red line that marks where the consonant ends and the vowel begins.
7. Overlap - Green line that marks the area that can be overlapped with the previous syllable.
Selecting one of the samples in the box and clicking "Launch Editor" will bring you to this:
The coloured objects mentioned before in the list can be click+dragged
The three buttons on the bottom right do the following:
Up - Go to the sound sample above
Down - Go to the sound sample below (as ordered on the table in the Voice Configurations)
Close - Closes this editing box
REMEMBER TO CLICK OK TO SAVE YOUR SETTINGS, OR SET IF YOU MANUALLY EDIT THE NUMBERS IN THE BOX IN THE VOICE CONFIGURATION.
2. CV otoing
There are several decent guides out there for doing this actually, so I guess this is kind of... not new information.The sound samples are split into three different types: Vowels, Hard Consonants, Soft Consonants
I'll explain how to oto each of them one by one.
BEFORE YOU BEGIN OTO-ING PLEASE DOWNLOAD ONE OF THESE TWO FILES AND USE THIS TO REPLACE THE OTO FILE IN YOUR VOICEBANK FOLDER.
- SAMPLE FILE NAMES ARE IN HIRAGANA: Romaji alias (Note that these are numbers because this was copy-pasted from my UTAU's CV bank. Just edit the sliders. If you get a bunch of symbols, change to Japanese locale or use Applocale to open etcetc.)
- SAMPLE FILE NAMES ARE IN ENGLISH: Hiragana alias
What are these you ask? These are oto files that have the aliases already done for you so you don't have to do them one by one on your own! Just edit them about.
Vowels (and n)
a/i/u/e/o + n
- Drag the offset (blue) till the wave has become stable. This is because for vowels, some of them are prone to having a little wonky sounds at the start (look carefully at the start of the blue wave. Can you see that it is a little different to, lets say the middle of the wave?), so you want to cut this out to ensure consistency. (Note: I did kind of cut off an excessive amount here. Anything from about 0.45+ is OK.)
- Drag the consonant (pink) over by about 0.1-0.2 seconds. (Or till the vowel has become stable)
- Leave the preutterance (red line) at 0
- Move the overlap (green) to halfway through the consonant (pink)
Then scroll to the end of the wave.

- Drag the cutoff (blue) to where the wave is still stable. This is to eliminate any fade outs/changes in voice as you finish the recording.
Hard Consonants
b/ch/d/g/j/k/p/t
- Drag the offset (blue) to the start of the wave. (Note: If the consonant is excessively long, feel free to cut it down. It should only be maximum 0.1 seconds long.)
- Drag the consonant (pink) over by about 0.1-0.3 seconds. (Or till the vowel has become stable)
- Move the preutterance (red line) in between the consonant and the vowel. (This is usually where the wave changes pattern)
- Leave the overlap (green) at 0 (or move it back to negative a little) (Note: I prefer leaving it at 0)

Then scroll to the end of the wave.
- Drag the cutoff (blue) to where the wave is still stable. This is to eliminate any fade outs/changes in voice as you finish the recording.
Soft Consonants
f/h/l/m/n/r/s/v/w/y/z
- Drag the offset (blue) to the start of the wave. (Note: If the consonant is excessively long, feel free to cut it down. It should only be maximum 0.1 seconds long.)
- Drag the consonant (pink) over by about 0.1-0.3 seconds. (Or till the vowel has become stable)
- Move the preutterance (red line) in between the consonant and the vowel. (This is usually where the wave changes pattern)
- Move the overlap (green) to halfway in the consonant.

Then scroll to the end of the wave.
- Drag the cutoff (blue) to where the wave is still stable. This is to eliminate any fade outs/changes in voice as you finish the recording.
Help! I can't see where the consonant ends and the vowel begins.
Have no fear! Amazing spectrum generator is here!
Clicking this circled button will make this happen to your box...

If yours comes up a bit faded and difficult to see the patterns, click the asterisk box that has now appeared next to the 's' box you clicked before
Then drag the slider up. This will improve the contrast.
Now, can you see the changes in patterns?
Vowels are usually several parallel white/slightly blue lines in the centre.
Consonants are usually a little more fragmented, like a cloud of light/dark blue pixels.
Keep at this for EVERY SINGLE SYLLABLE and you'll have yourself a nifty bank!
CONGRATULATIONS, YOU'VE NOW OTO'D YOUR CV VB AND IT IS NOW READY TO SING! Hope to see some lovely covers from you soon! -v-)/
3. VCV otoing
Now, I HOPE you've used a tempo guide. If you have, this will be a lot more painless than it needs to be. If not- a lot more of these will come out potato.
We'll be using OREMO's VCV oto generator, so open up OREMO, change the directory folder to your voicebank.
Now, go to Generate oto.ini -> Kind of Utterance -> VCV

You'll then get this kind of window:

In the recording tempo, place the tempo you recorded at.
Now open up one of your samples. They should ALL begin at the same-ish time. Note down the start of this and place it in the box labelled "Utterance Start" and make sure you're in the right units! (800ms = 0.8 in the oto editing)
You can click "Initialise Parameters according to Recording Tempo" if you want, but it won't be perfect.
The guide for the numbers for each section is in this range:
Then click Generate Params (after you've made sure the boxes afterwards are ticked like this or something)
And hope for the best. (If an error occurs, untick the Parameter Auto Correction 2, and if it still occurs, untick the Parameter Auto Correction 1)
Then BAM you will be prompted to save your oto.ini file somewhere (put it in your Voicebank folder) and now, comes the moment of truth.
Open a UST and run your voicebank through it.
If it sounds choppy anywhere, click on that note and while it is highlighted, open the Voice Configurations.
Now click Launch Editor

Sample of the first sound

Sample of every sound after the first
Here is the sample to reference. Note the following characteristics:
- Offset (blue) - cuts off all but the end 1/3rd of the first sound. (If you are checking the first sound, leave 1/3rd of a blank space)
- Consonant (pink) - Covers 1/3rd of the second sound.
- Preutterance (red line) in between the end of the first sound and the beginning of the second sound (It's not perfect, but close enough. Considering that there are 1000+ samples to take care of, not all of them will be exact. It is up to your judgement as to what is 'close enough', but I think this is appropriate for the 'limit)
- Overlap (green) to halfway through the pink area of the first sound
- Cutoff (blue) - cuts off the end 1/3rd of the second sound.
This applies to all sounds.
If any of these are out, then it will ruin the rest of that one sample, and you'll have to manually fix it (using the guidelines I provided above)
If a LOT of them are out, then you should change the numbers in the oto.ini generator. If the red is too far forward, reduce the number in the preutterance etc.
Help! I can't see where the consonant ends and the vowel begins.
Have no fear! Amazing spectrum generator is here!
Clicking this circled button will make this happen to your box...

If yours comes up a bit faded and difficult to see the patterns, click the asterisk box that has now appeared next to the 's' box you clicked before
Then drag the slider up. This will improve the contrast.
Now, can you see the changes in patterns?
Vowels are usually several parallel white/slightly blue lines in the centre.
Consonants are usually a little more fragmented, like a cloud of light/dark blue pixels.
Eventually after a lot of editing around, run through USTs, you'll get your perfect bank.
CONGRATULATIONS, YOU'VE NOW OTO'D YOUR VCV VB AND IT IS NOW READY TO SING! Hope to see some lovely covers from you soon! -v-)/
4. Final notes
CVVC otoing - ch.nicovideo.jp/delta_kimigata… (Credits to the original writer for this)To make the rendering of the samples faster:

Right click anywhere on the table (highlighted here by the big red box). Go down and click select (It's the bottom most option that has (M) ). Then, right click it again, and then click select all (New bottom most option that has (A) or something along those lines). This will make all the tables be highlighted in blue. Once you have gotten to this stage, click the smaller circled red box here, called Initialize freq. This will render all the frequency files so that they load faster when you play a UST.
Thanks for reading, hope to see your UTAU up and about!
EDIT: 7/06/2021 While I appreciate the comments and would love to assist, I don't really dabble in UTAU anymore, so I wouldn't be the best person to be asking.
© 2016 - 2024 Cabbagesaurus
Comments70
Join the community to add your comment. Already a deviant? Log In
I know this was posted years ago, BUT
my crappy crap sounds almost normal now. I GENUINELY CAN'T BELIEVE HOW OKAY IT TURNED OUT, I SUCK AT THESE STUFF :D
THANK YOUUU
